Creating a Private Network Connection to a NATed Router Across Countries
I flashed FreshTomato 2024.2 to my R8000 router and wanted to play around with it. I wanted to access some content from my home country so I created dedicated WiFi network that routes all traffic through a Wireguard VPN. In here I detailed how you can do that. But first terminology, so we know who is doing what.
- Home Node: Refers to the “hub” node that has a public IP. This is where the traffic originates.
- Remote Node: Refers to the “remote” node where traffic exits. This node might be behind a NAT’d, which in my case it is.
 FreshTomato installed on both routers, home router sends traffic to remote node
Setting up the VPN connections
The main actor, the home node to which everyone communicates is my router. At home, my ISP provides the ability to bridge the connection so my router could get a public IP that anyone in the world could access.
On the home node, create a new wireguard server through the FreshTomato UI, login to the admin interface. Go to VPN > Wireguard, in my case I’ll use wg1 as the interface that I’ll use to create the new server.
The following are the fields that you’ll need to modify. In the Interface portion you’ll need to.
- Enable on start, set to true.
- Generate a private key for the interface
- On
VPN Interface IP, I used10.12.0.1/24, which means that any client in this wireguard connections is able to use10.12.0.2/24 - 10.12.0.254/24. - Make sure that you set the Routing Mode to off as we’ll modify the routing ourselves.
Then in Peer Parameters, you’ll have to:
- Set the Allowed IPs to 0.0.0.0/0. This will allow your router to forward local traffic (that is reaching out) to the world to proxy it.
- In
Type of VPN, set it toHub (this device) and Spoke (peers)
The settings should look like this:
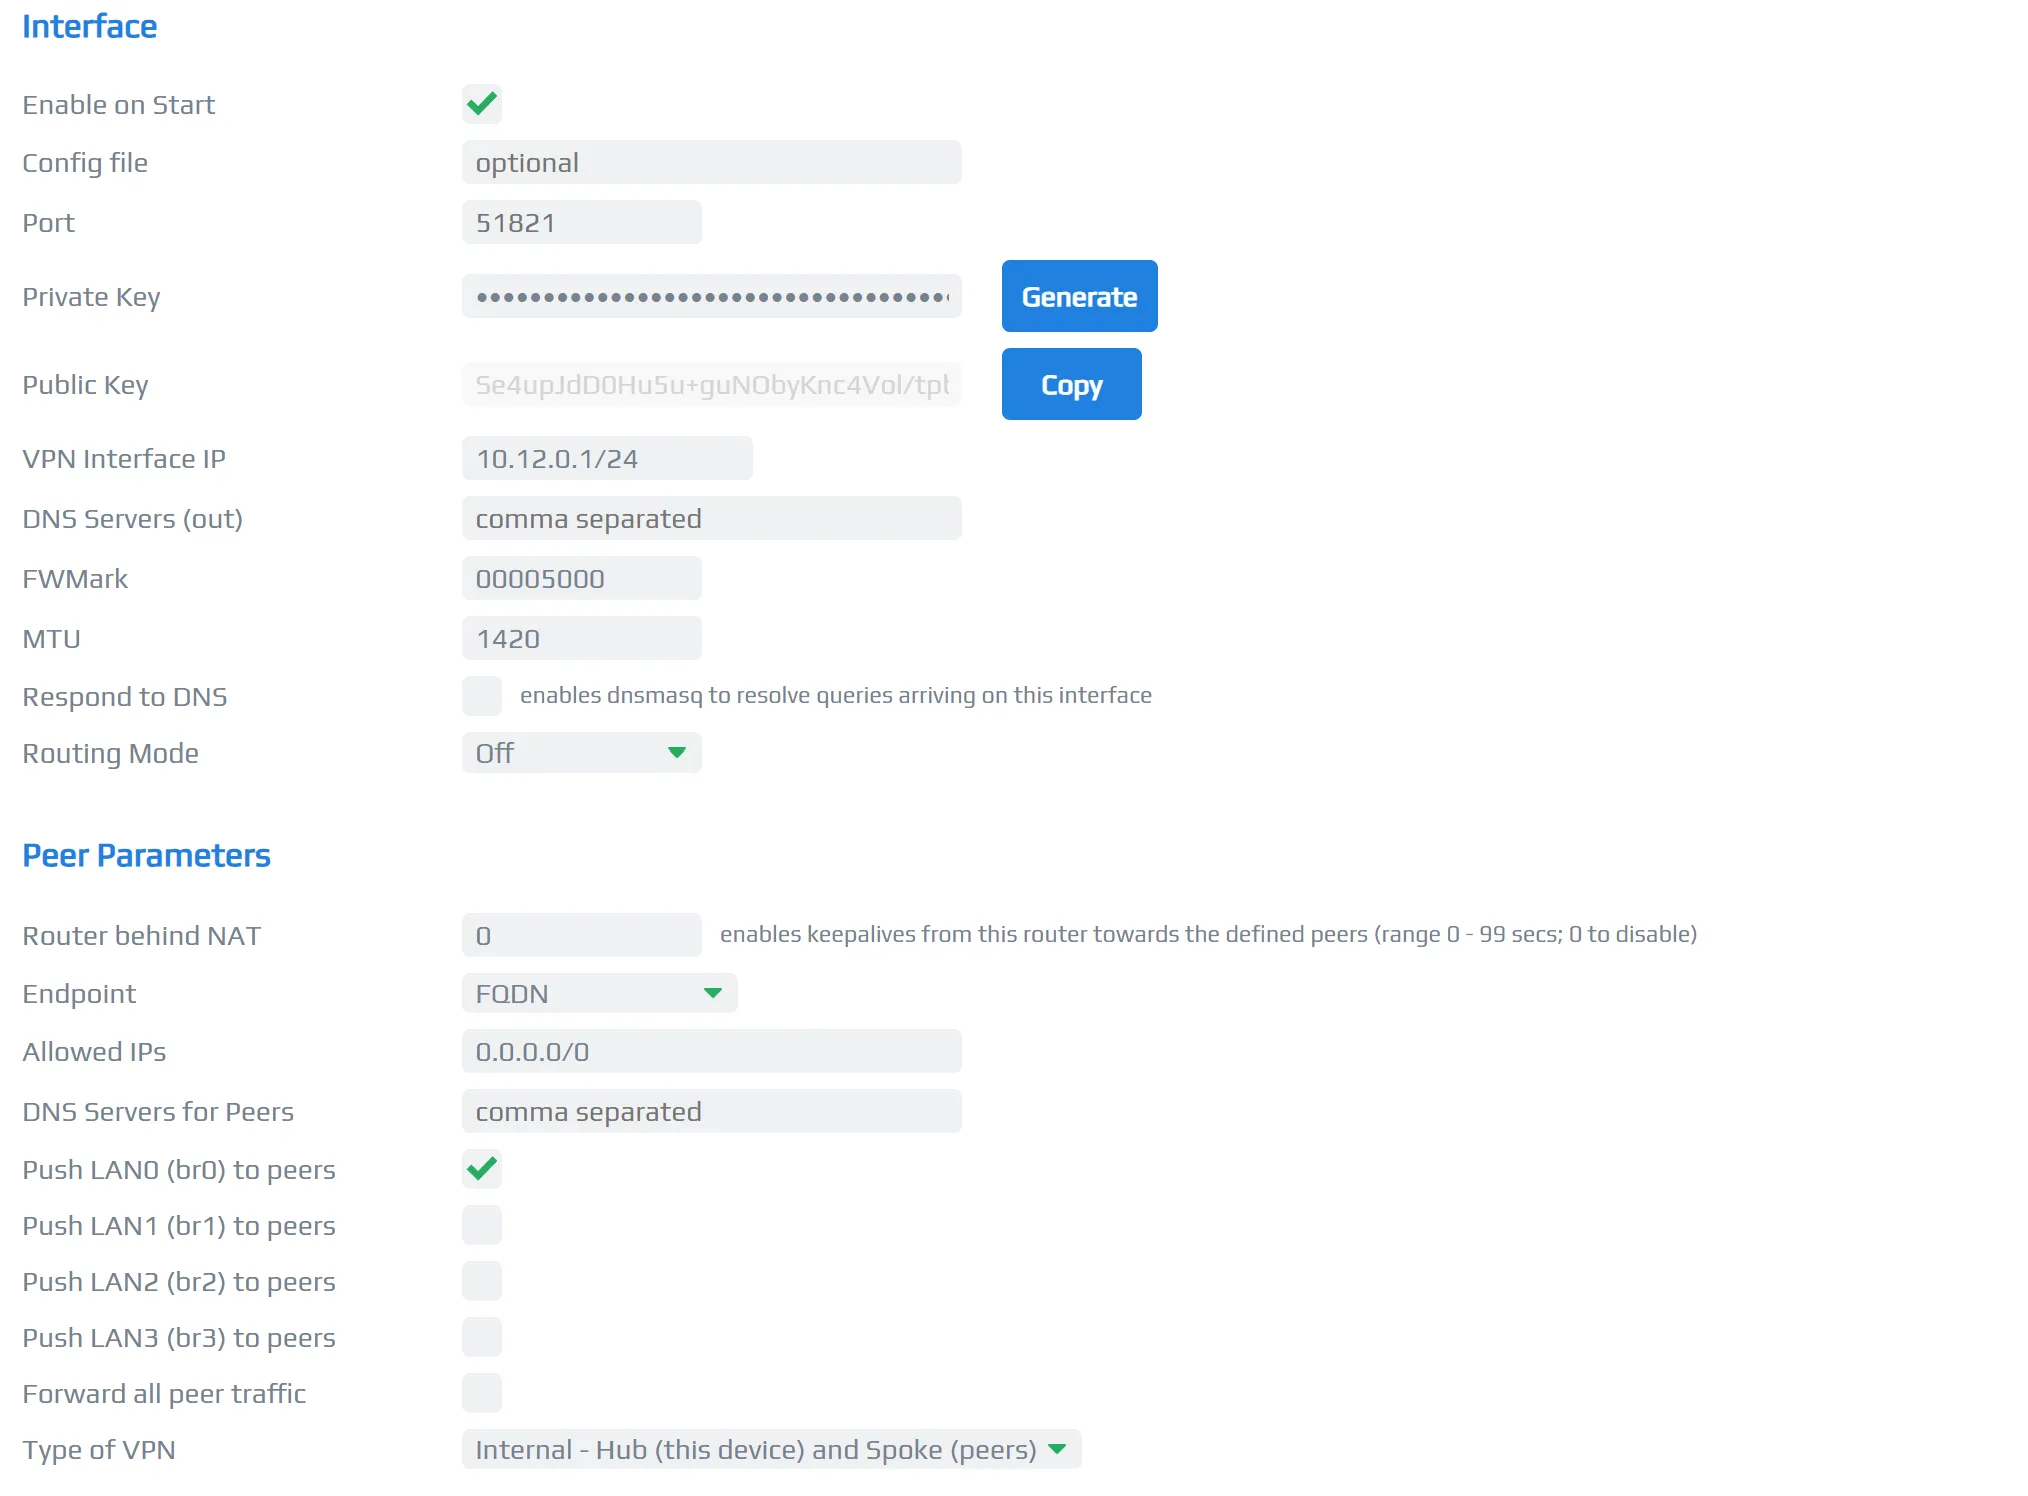 Home node wg1 interface configuration
I also checked Push LAN0(br0) to peers as I would like the endpoint to actually communicate with devices in my
local network. This is not required but it is a nice to have, specially if you have someone on the other end
that wants to access local services that you have in your local network.
Create & configure the remote node
On the config tab create a client and download the configuration file. FreshTomato helps you in this process, it provides a Generate Peer button that is able to fill in all of the fields as required. The file will be generated and then you’ll have to configure the remote node with it.
On the remote node import the file, make sure that the IP on the VPN Interface IP matches the client IP on the home node and that routing mode is again, disabled. In my case, I’ll configure wg0 in the remote node instead of wg1. Since the remote node is behind a NAT-ed network, I’ll enable the Router behind NAT configuration. This allows the remote node to create a NAT punchthrough.
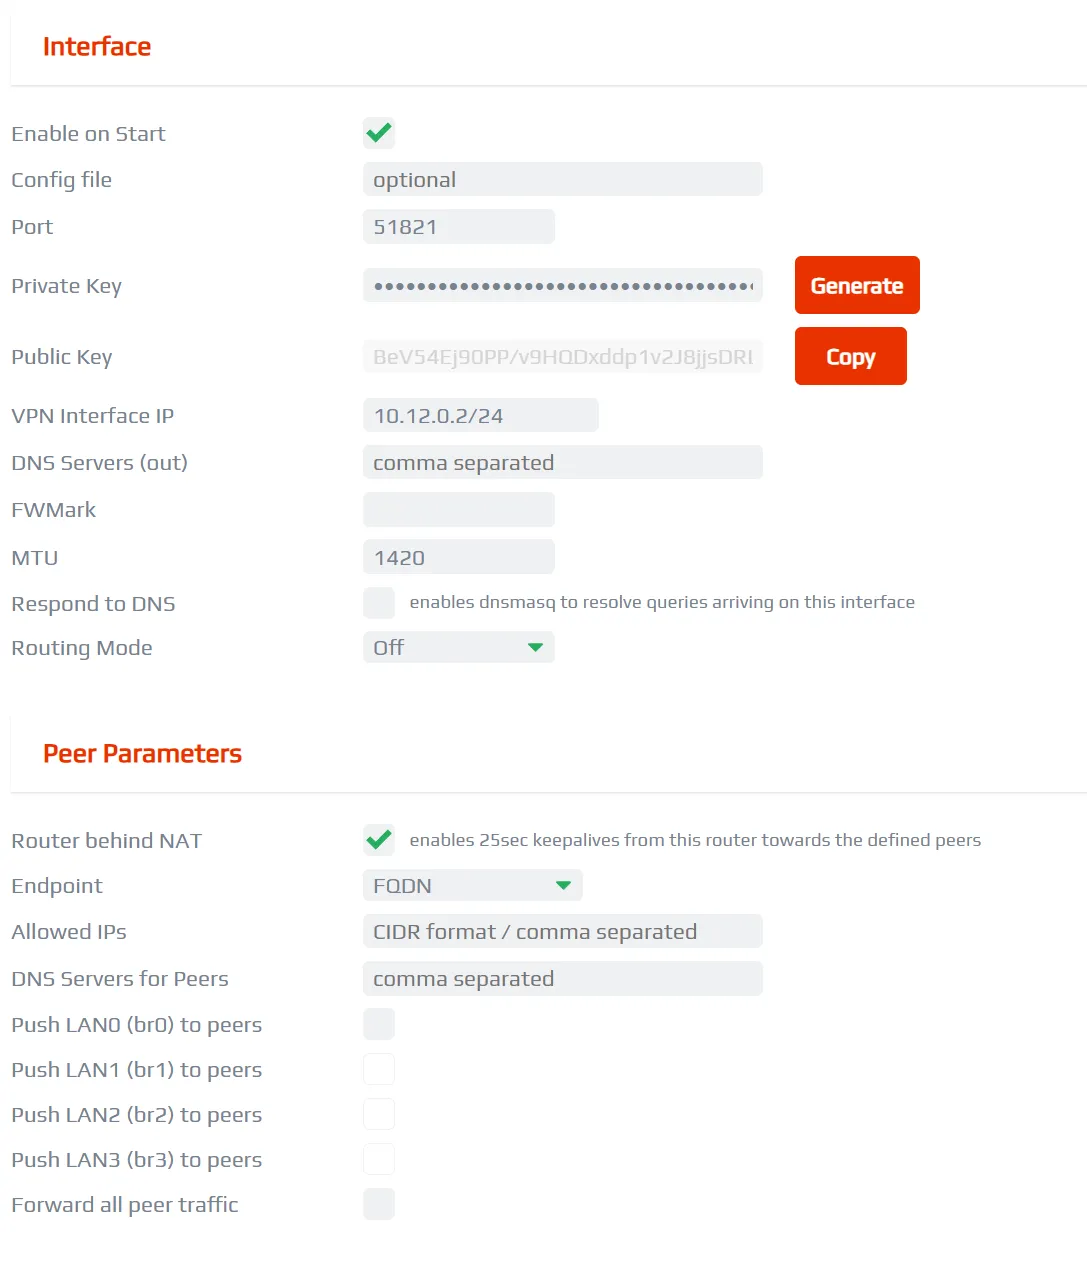 Remote node wg0 interface configuration
Then we need to tell the remote node of the existence of the home node. Go to the Peers section. Fill in the peer paramters based on the information provided in the home node. The VPN Interface IP should be set to 10.12.0.1/32 and the Allowed IPs should be 0.0.0.0/0.
At this point you can SSH into your home router ssh router and make sure you are able to ping the remote node from your local router.
root@router:/tmp/home/root# ping -I wg1 10.12.0.2
PING 10.12.0.2 (10.12.0.2): 56 data bytes
64 bytes from 10.12.0.2: seq=0 ttl=64 time=97.729 ms
64 bytes from 10.12.0.2: seq=1 ttl=64 time=94.886 ms
64 bytes from 10.12.0.2: seq=2 ttl=64 time=96.097 ms
^C
--- 10.12.0.2 ping statistics ---
3 packets transmitted, 3 packets received, 0% packet loss
round-trip min/avg/max = 94.886/96.237/97.729 ms
Routing and Tables
Yay, home can phone remote! Though it’s not over yet. Once that is complete, we’ll need to setup the forwarding system in our home network to send only the traffic that we are interested on to the remote node. In order to do that, I’ll create a subnet on the router. In order to do this, on the home router, create a new bridge under Basic > Network.
In my case, I’ll create a brige called br3 with a subnet 192.168.4.0/24. I don’t think I’ll ever have more than
that many clients connected to my router anyways.
 New br3 bridge in the list of interfaces
Now, let’s build our routing tables one at a time and then group it all into a single script to execute when wg1 comes up on the home node.
Revese Path filtering (rp-filter)
Reverse Path Filtering (rp_filter) is a Linux kernel security feature that helps prevent IP spoofing attacks by validating the source address of incoming packets. It works by checking if the return path to the source IP would use the same interface that received the packet.
In our case, traffic is being redirected through a VPN tunnel and custom routing tables are being used, packets may arrive on one interface but the kernel would normally send responses through another. With rp_filter enabled, these legitimate packets would be dropped.
echo 0 > /proc/sys/net/ipv4/conf/wg1/rp_filterThe Way Through
The Table
iptables and ip route is the way in which we communicate to the kernel what to do when traffic comes in. In our case, we want the traffic our subnet to be handled differently so we’ll create a new route table where the default way of routing traffic is through wg1.
echo "200 wg1" >> /etc/iproute2/rt_tables
ip route add table wg1 default via 10.12.0.2 dev wg1
But, how does wg1 sends the information to the remote server? How does it know that? My intuition is that on top
of the via hint, Wireguard acutally useses the Allowed IP directive to find where to route traffic internally.
Marking Traffic
Ok, so we have a table, now what? Well, we have to tell the router which traffic should use it. In iptables we will set rules to the PREROUTING mangle chain. The PREROUTING chain in iptables processes packets as soon as they enter the network interface, before any routing decisions are made. This allows us to manipulate packets before the Linux kernel decides where to send them. The rule will “mark” traffic coming in
from the interface.
iptables -t mangle -A PREROUTING -s "$subnet" -j MARK --set-mark 0x80000/0xf0000Then we’ll create a rule to treat traffic with the mark to use our new table:
ip rule add fwmark 0x80000/0xf0000 table wg1Nice, now everything is complete. Except wait, DNS! We are leaking DNS information. Since
DNS is propagated through DHCP, we can either configure dnsmasq to apply specific DNS settings on the network
or simple DNAT the traffic going into our local DNS Server. I’ll do the latter as I have a Pi Hole locally so I know the static IP address of my home and remote DNS server:
iptables -t nat -A PREROUTING -p udp -s $subnet -d $HOME_DNS_SERVER \
    --dport 53 -j DNAT --to-destination $REMOTE_DNS_SERVER
Hey I don’t know this IP!
The remote host does not know the IPs on our local network or how to route traffic back so we’ll need to NAT our traffic out of the router with a MASQUERADE rule
iptables -t nat -A POSTROUTING -o wg1 -j MASQUERADENow we are done! Wrapping it all on a script:
# This would be the IP of the node where all the traffic will be redirected to (located on wg1)
DESTINATION_NODE_IP=10.12.0.2
# Subnets that will have their traffect forwarded the destination node
SUBNETS_TO_FORWARD="192.168.4.0/24"
LOCAL_DNS_SERVER=192.168.1.240
REMOTE_DNS_SERVER=10.12.0.3

# Create the route table that will be used by our selected subnet
if ! grep -q "wg1" /etc/iproute2/rt_tables; then
echo "Creating table 200 with name wg1"
echo "200 wg1" >> /etc/iproute2/rt_tables
else
echo "Table 200 wg1 already exists"
fi

# Create the NAT rule to masquerade traffic from router to wg1
iptables -t nat -C POSTROUTING -o wg1 -j MASQUERADE || iptables -t nat -A POSTROUTING \
  -o wg1 -j MASQUERADE


# Create the route table's default route to wg1
if ! ip route show table wg1 | grep wg1; then
echo "Adding default route to table wg1"
ip route add table wg1 default via ${DESTINATION_NODE_IP} dev wg1
else
echo "Routing table wg1 already has a route to wg1"
fi

# Create the rule to use our newly created table
# for packets with our fwmask
if ! ip rule | grep "fwmark 0x80000/0xf0000"; then
echo "Adding rule to use use table wg1 for packets with mark 0x80000"
ip rule add fwmark 0x80000/0xf0000 table wg1
else
echo "Rule for fwmark already present"
fi

for subnet in $SUBNETS_TO_FORWARD; do
# Setup the fw mark on all the packets in our subnet
echo "Creating mangle rules for '$subnet'"
iptables -t mangle -C PREROUTING -s "$subnet" -j MARK --set-mark 0x80000/0xf0000 || \
iptables -t mangle -A PREROUTING -s "$subnet" -j MARK --set-mark 0x80000/0xf0000

echo "Forcing subnet '$subnet' to use remote DNS server"
rule="PREROUTING -p udp -s $subnet -d $LOCAL_DNS_SERVER --dport 53 -j DNAT \
  --to-destination $REMOTE_DNS_SERVER"
iptables -t nat -C $rule || iptables -t nat -A $rule
done
This script should be added to the boot up process of the router. Go to Administration > Scripts and add it under the Firewall tab. If you are running out of NVRAM, add it to a file (in a plugged in USB or to JFFS) and then just reference it.
Setting up the WiFi network
Setting up the WiFi network, you’ll need to tell FreshTomato to bind your WiFi network to the correct bridge. Go to Advanced > VLAN and bind your desired WiFi to the VPN-ed bridge.
 VLAN config FreshTomato
Hurrah! This should set everything up. Try out your new VPN-ed network! There is a lot more fun stuff to do with iptables and VPNs. You configure another Wireguard VPN that is used by your phone to either access your local network or even use your home network as a relay to the remote host! But more on that later.